How to turn a bold lipstick nightmare into an everyday dream

February 8, 2015

Have you ever wanted to try a brave lipstick trend like a classic red lip or a dark wine pout? I’ve been there too.  Sometimes you get just the right color and you think “I am so glad I did this-it’s exactly the change I needed”. More often than not though your response is “Why did I think I could pull this off?” or “Where would I wear this?”. Yep, been there too. This holiday season I was determined to rock the bold classic red lip that was featured in Bobbi Brown’s email. The model was fair, like me so I thought if she could pull it off, I could too. When I actually tried the look out, it didn’t look bad but it just wasn’t me. I’m a more natural but polished kind of girl and I just felt uncomfortable. Before I went to return it, however I tried some tricks in order to make it more “me” and voila, I salvaged the lipstick and now I have a new rosy lip look. If you have had the same sort of experience with a lip color that just didn’t turn out how you wanted, before you return it, try the below tricks to see if you can make it fit into your lifestyle.

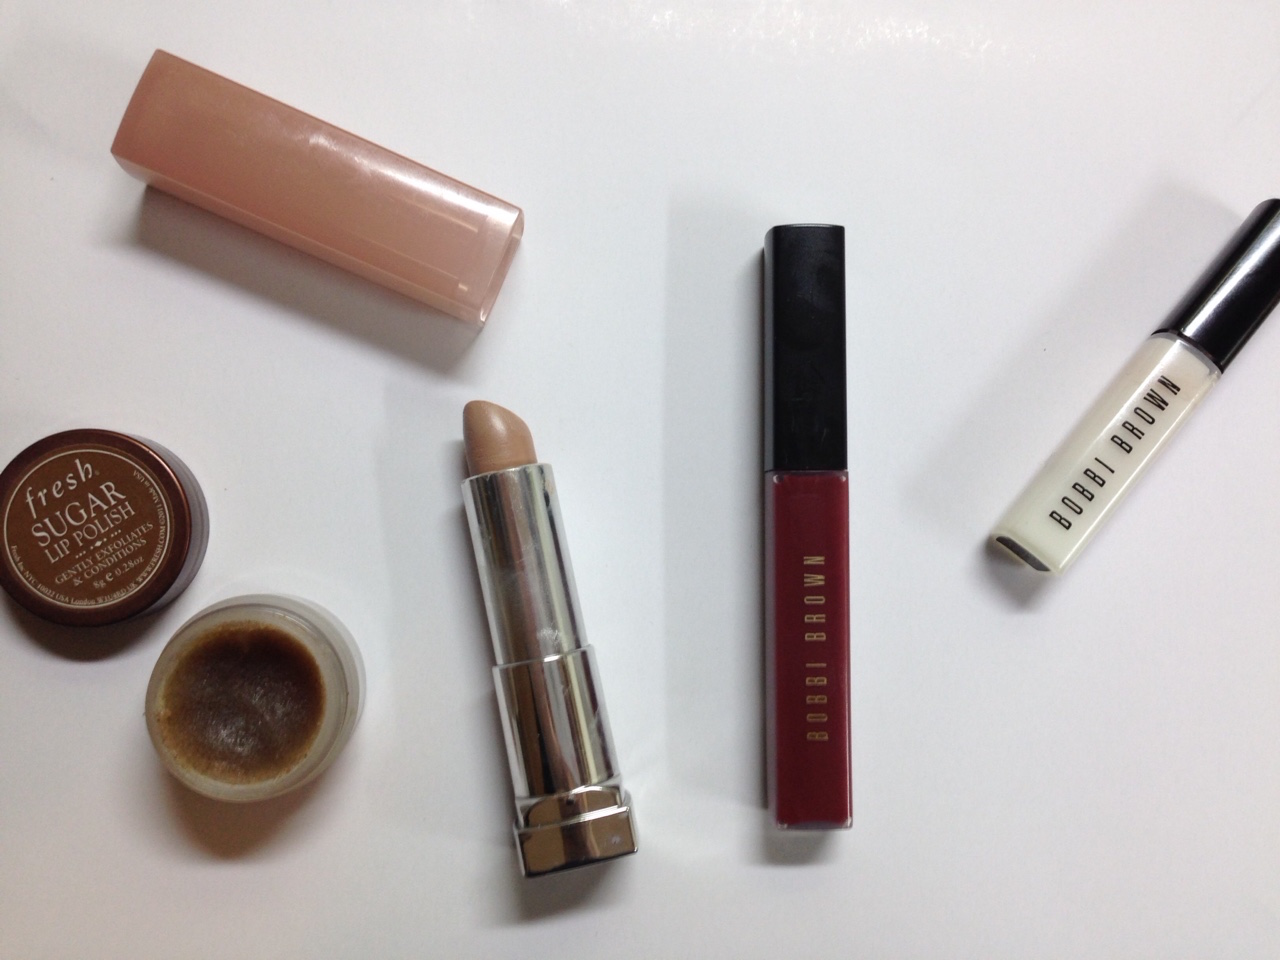
1. First make sure your lips are nice and smooth to start with. The cold has reeked havoc on everyone’s skin, especially our lips. Try exfoliating them and then applying a nice balm after on a regular basis (nightly if you like). You can buy lip exfoliants from brands like Fresh and Sara Hipp but its really easy to make it at home. Mix a little oil and sugar in your hand and then rub over lips after wetting them with warm water for about 30 seconds. Wash off with warm water and then apply your balm. Don’t have any sugar? An old toothbrush will also work. This step is important because the more chapped your lips are the more they will stand out (in a bad way) when you apply a statement color lip.

2. Apply a muted lipstick. I have one that I like from Maybelline that I wear on its own called Raw Reveal. If you don’t have a muted lipstick that’s ok (but consider getting one-they are really great when you want to create a feminine look. I love big lashes and muted lips) you can use a cream or liquid foundation or a concealer. This purpose of this step is to tone down your color but it will also help your color adhere to your lips. Bonus!

3. Apply your color choice. I like to apply with a lip brush as you have more control in putting the color exactly where you want it. If you don’t have one, you can apply right from the tube but GO EASY. Do not put a lot of pressure on the lip as you did with your muted lipstick. Apply until you feel comfortable with the color depth and then finish by rubbing your lips together to blend step 2 and 3 together. Your color should resemble the one in the tube but should be a softer, less aggressive version.

4. If you like your look feel free to call it a day and be done. I personally love to end the look with a pearly, brightening lip gloss. The gloss does a few things for this look. It makes it less “I’m on the way to the Oscars” and more “I’m running to a meeting and look pretty” which makes it appropriate to wear in everyday situations. It also brightens the look up with a white color and it gives it sheen. My favorite (surprise, surprise) is Bobbi Brown’s Brightening Lip Gloss in White. It lasts forever, is applied with a lip brush and smells like vanilla. I wear this over almost anything as well as on its own.

So what do you think-want to give it a go? Hopefully this helps you feel a little bit more comfortable about going out of your lip comfort zone.

IMG_0211

Ombre Nation

January 30, 2015

As many of you know, I ombred my own hair last summer (did I just make a up a verb? I think I did) when my stylist didn’t do it as heavily as I wanted. I did it in two sessions – a week apart to make sure I got the right amount of blonde until I was happy with it. It was wonderful for the summer – it definitely provided that “I live at the beach” sun-kissed look and people were shocked when I said I did it myself. But at my last haircut several inches were cut off, cutting off some of the lightest blonde shade and now I’m just kind of “eh” about my hair and color. It could be that its winter and everything is boring. It could be that I’m growing out my bangs for my wedding and need something to me excited about my hair while it does (as I can’t cut it off). At any rate, after some time well spent scouring the many pages of Pinterest, I’m kind of falling in love with a sombre (subtle ombre) brown-reddish look going on. See below.

Long red waves

Yes, I know my hair isn’t this long. How beautiful is this color though?

Long brown waves

This has some blonde in here (which I’m not opposed to).

red and gold

So pretty.

For this color change, I’m going to seek the experience of a hair professional although I am really proud of myself for doing my own for less than $15 the first time around. For those of you are interested in trying your hand at blonde at-home ombre, below is the product I used (it comes in three different color options) and a picture of the technique I used.

Loreal

Blonde DIY

Here’s how it turned out (note, it does not come with a handsome bald man 😉

MJEng_43_FatOrangeCat-WEB

Are you going to ombre?

XOXO

Maureen

Beauty and Storage… my two favorite things!

November 30, 2014

Recently I was asked  to write a blog post about how I organize my makeup and boy was I excited. Just as much as I love beauty products, I equally love organizing them. There are two ways you can store your beauty loot – covered/tucked away and showing them off at all times. For those that know me I’m sure you’re not surprised that I love option number two. It’s not that I’m showing them off really, but more happily gazing at my collection of mascaras, eye shadows, blushes and nail polishes and how they are  neatly displayed. I find that this option is right for me because it not only makes me happy but it allows me to keep inventory of products that I own so that they do not go unused (you know what I’m talking about – “oh, heyyy, I remember this lipstick from a year ago!”). I really like the acrylic organizers that you can purchase online or in stores like TJMaxx, Target or Marshalls. I actually got my collection at a combination of The Christmas Tree Shops as well as ideel.com but you can find similar ones online. I like these because they provide a lot of different storage options depending on how much beauty merchandise you need to organize, the type and how you need to see it (some have drawers, while others swivel).

Below are pictures of my beauty organized (forgive the picture quality). As you can see I like everything in its place and I also like to see everything clearly. While I could not find the exact ones online you can click below to the links I provided for you to get an idea of what works for you.

IMG_1289 IMG_1288 IMG_1287

This isn’t beauty but I had been searching for a jewelry organizer to display my bracelets, earrings and rings in an organized fashion and am so excited I finally found this. Doesn’t it look like a store display? Everyday I feel like I’m shopping… my own jewelry!

Target

Bed Bath and Beyond

Not into displaying all you have? Or maybe you have less space than you would like and need to have your beauty stored away. No problem. When I travel, I take my necessitates into one bag without any pockets so that I don’t miss anything. How cute are these ones below?

34502242202745p15010172

And for those that are experts, check out the one below!

13514452

How do you like to organize your beauty stash?

Maureen

The At-Home Mani (on the cheap!)

November 2, 2014

I love a good manicure and pedicure and I love the nail salon near our house in Newton, Massachusetts. It’s always nice to treat yourself to these often not only because  of the stress relief and beauty benefits but because you don’t want things like overgrown cuticles (which keep your nails healthy and prevent infection), callasuses, and in grown nails out of control. That said, time and financial reasons don’t always allow for us to do these regularly but with a little work you can do your own manicure at home. It might take a little practice if you’re just starting out but be patient and take your time. The more you do it, the better you will get-trust me.

Step 1: Soak hands. Soak both hands in a little bit of warm, soapy water for a few minutes. This gets your cuticles ready for grooming.

Step 2: Removing cuticles. Apply a cuticle remover (see link below for options from Sally Hansen) rub in to cuticles for a few seconds. Next, take a push back tool (this will be one of the most expensive items you will purchase in this post) and push back your cuticles. You have two types of cuticles, the ones you want to get rid of (the thin later right on your nail that you can hardly see) and the thicker part that you either leave or trim back in the next step.

Step 3: Trimming cuticles. This is up to you on how much you want to do here as you may not feel comfortable trimming your cuticles and hang nails. If you do feel comfortable, you want to purchase cuticle scissors and I suggest not purchasing cheap ones and go with some by Revlon. You will have these forever and they really make a difference. Cheaper ones are dull which makes it more difficult to snip and get a clean line. Make sure these are clean before you use and gently trim your outer cuticles, hang nails and excess skin. My fiance could tell you this is one of my favorite tools- I’m often snipping away at random hang nails as any excess drives me crazy. Remember to clean your metal and stainless steel tools with soap and really hot water you are done with everything. Repeat Step 2 and 3 on the other side once completed.

Step 4: Oil up. Next rub some nail oil into your nails and cuticles. If you don’t have any at home you can use olive,  coconut or grape seed oil instead. You just need a few drops, so go easy.

Step 5: Filing nails. Your shape is up to you but I usually do something  in the squoval (combination of square and oval) range so they are not super severe either way. You don’t need an expensive or heavy-duty nail file (unless you have artificial nails) so your best bet is to get the cheap, tan cardboard kind that are sold in the drug store. These are gentler on your nails than other files. If you don’t want to use these make sure you pick a file that says its specific for natural nails or else you will file down your nails until there is nothing very easily.

Step 6: Buffing nails. This is your choice as the shinier the nail, the harder it is for nail polish to adhere to the natural nail but I enjoy doing this because it gets ride of ridges and smooths out the nail bed. I use buffers that are four-sided and have numbers on each side so you know which step to do in which order.

Step 6: Exfoliation (optional). This is not necessary but its nice step that adds a little luxury to your standard manicure. Don’t have an exfoliating rub? No problem. Mix 2 tablespoons of either sugar or salt with a little bit of oil (again your choice) and rub over your hands, wrists and lower arms. Rinse under warm water and pat dry.

Step 7: Moisturize. You can use any lotion you like. Make sure you rub into nails and into cuticles. After, take a cotton round and wipe nails off with nail polish remove (preferably acetone free since acetone can dry our your nails and skin).

Step 8: Prep. This is not mandatory but its a nice step and if you are using a dark or bright color you should make sure to include this into your manicure regimen. If not, when you go to remove your color days or a week later your nails will be stained and most likely a dark pink. Choose your base coat by your need: trying to grow your nails? Choose a growth treatment. Weak nail problems? Choose a formula with strength. When all else fails just choose clear since something is better than nothing. Often times this is where my manicure will end since just having groomed nails and cuticles is good enough for me. If I have the extra time and patience I will continue on to the steps below for color.

Step 9: Color. Choose your color. I love dark and bright colors on short nails and soft pinks  on nails with a little length. How many coats is up to you but the standard is two coats. Your application should be as follows: one stroke down the middle of the nail, and then one stock on each side. Nervous? Go lightly on the polish for the first coat since it sets the base for your color. You can always apply more color if needed.  Remove any excess polish that got on your skin with orange sticks from the drugstore (I LOVE these things). If you don’t get it perfect that’s ok. Remember that polish doesn’t stay on the skin for long, so it should come off in your shower or when you wash your hands.

My favorites colors? Essie’s Ballet Slippers, Mademoiselle, Vanity Fairest and Figi. I know, I know. All light pinks – notice a trend?

Step 10: Top coat. Any basic clear does the job but if you want the creme of the crop choose Seche Vite. It dries your nails quickly and deposits a glass-like shine. This is a must-have and really ups your manicure at home. Also, one bottle lasts forever.

Step 11: Wait! After all that work, wait it out at least a good 15 minutes. Watch tv, work on the computer (slowly) or just relax. A trick my mother (a former hairdresser who had to take manicure classes during beauty school) taught me to check if your nails are dry is to take your thumb and lightly rub it against the skin under your nose, above your lip. If the nail is ready and dry, there will be no stickiness and the nail will feel like glass against the skin. If it doesn’t, you need to wait a bit more.

Some of my favorite manicure must have tools:

Revlon Cuticle Nippers


Cuticle Pusher


Orange Sticks


Seche Vite


Enjoy!

Maureen