My two go-to’s to get in my daily water intake

Like most of you, I struggle with drinking enough water on a daily basis. I am following the Weight Watchers program (loosely) and there is something so satisfying about clicking the plus button to add more water – its like checking off a to-do list item or reaching a small goal. Drinking water is so good for everything – weight control, skin, hair, digestive system, energy and focus… the list goes on. Now that its summer and getting hotter, we really need to up our intake, whether we are inside working, being active or out in the sun. I have found for me there are two main reasons why I don’t get my daily water intake: losing track of how much I’m actually drinking and boredom with the taste. If either of these are challenges for you, keep reading.

When I worked in Boston and commuted in by train, I used to start off productively – drinking a whole water bottle on my ride in, before I had my coffee. I would refill… and then forget about it. As the day went on, I would forget where I was in my daily intake and either under or overestimate how much water I was actually drinking. No bueno. I found this great water bottle from Joseph Joseph – its 20 ounces and tracks at the top of the cap how much you are drinking – problem solved! After you drink your first 20 ounces and you put the cap back on, it clicks and a white dot appears letting you know you are 1/4 done with your water goal for the day (there are 4 white dots so if you plan to drink more due to your weight or fitness needs you will have to keep track on your own after the fourth click). It comes in four colors and is really inexpensive. I had a red one at first and my son lost the cap so I bought a new one in blue. I also bought one for my best friend Kate last year because she wasn’t drinking enough water and became dehydrated. I figured visually seeing she wasn’t drinking enough with the white dots would encourage her to drink more. I put the link below to their site, but you can buy these on Amazon, as well as flash sale sites occassionally. It looks like right now the red is half off!

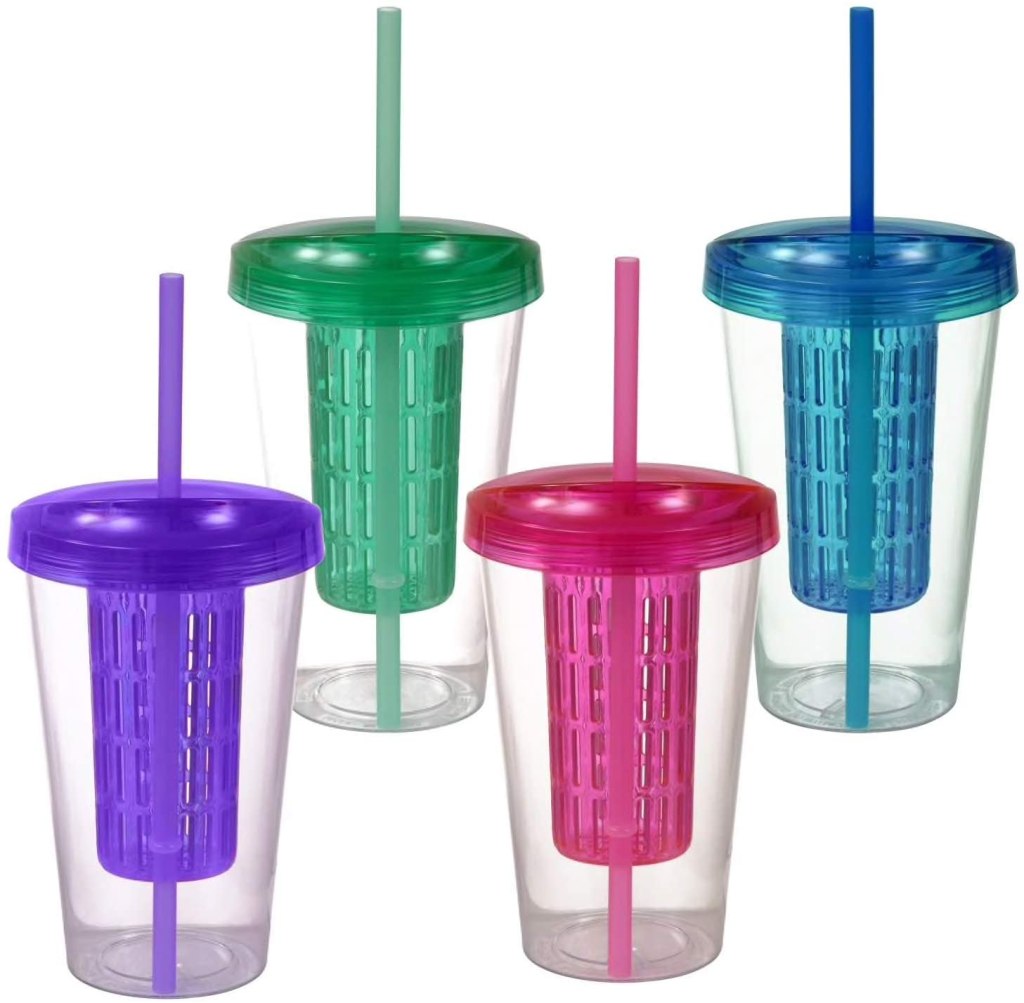
The second reason I don’t drink enough water regularly is… well its boring. Don’t get me wrong, after a workout, there is nothing I want more than ice cold water. But other than that, I really like flavor in my water if I can (probably why I have a love/hate relationship with sugar too). While on occasion I will add some low calorie flavor to my water like Crystal Light or TrueLemon, I prefer fruit if I have it. I will cut up fresh fruit I have like lemon, watermelon or strawberry and put it in my water, first letting it sit for a little bit to absorb the flavor. More often than not, I use frozen fruit I have on hand for smoothies, which is more enticing because usually its pineapple, mango and melon. If this sounds refreshing, you can definitely use any glass or water bottle but I prefer the ones where the fruit is contained so that I I don’t have it hitting my nose or face. The one I have is from Cool Gear but I couldn’t find it online. This is almost identical and a lot cheaper on Amazon.

Happy Sipping 🙂

Maureen

Kristin Ess Air Dry Creme Review

Like many of you (specifically moms at home) I have count on one hand how many times I have blow-dried my hair since Covid-19 started. Since most people were not going into work, it just didn’t seem worth it to go through the hoopla of blow-drying and curling/straightening it, even for one of many Zoom calls. I started just throwing my hair up in ponytails or messy buns out of the shower and calling it a day. Then on one of many trips to Target to get out of the house (anybody else do this?), I stumbled upon Kristin Ess’s Air Dry Creme and discovered gold by pure accident. She writes on the back of the product listing, “If you use only one product, use this” and she’s 100% correct. You literally wash your hair, wait until its about mid air-dried and scrunch in this creme and Voila! You get this beautifully undone-done, “how did she get that look?” texture look that Kristin Ess is so famous for giving celebrity clients like Lauren Conrad and Lucy Hale. Now that I’m home with our three year old son everyday solo, I have even less time to put into a grooming routine so this is perfect for me, especially going into the warm weather. I plan on using this all summer as my go to product to give my light waves a boost of coolness with a soft (non-crunchy) feel. Buy this and let me know what you think!

Kristin Ess 2Kristin Ess 3Kristin Ess 4


Olaplex Review July 2019

Over six months ago Olaplex came on my radar – both by way of blogs and reviews from coworkers. Everyone said how amazing the Hair Perfector was and that it changed the way their hair looked and felt, especially if you colored your hair. About that time the brand also launched their shampoo and conditioner to accompany the Perfector (a treatment you put in for a minimum of ten minutes before you shampoo up to 2-3 times per week). I was extremely curious and if you know anything about me, once I get something into my head, I have to do it/have it/buy it IMMEDIATELY. I should have known I would have been disappointed when I felt this way because most things don’t meet with my expectations and then I’m underwhelmed, mostly due to my need for instant gratification and hope for the impossible – perfection.

I found the Shampoo, Conditioner and Perfector to be just “meh”, which was disappointing especially due to the price tag. Each of the three products retail for $28, which is pricey, considering their small size. Maybe it’s me and the fact that I have fine hair but I consistently found this dried my hair out instead of putting back moisture in it, something that is needed for colored hair. I didn’t see any difference with the Perfector either, no matter how long I left it on for. I got more out of Brigeo’s Repair Don’t Despair mask, which makes my hair feels so much better after using it. I have been trying to use through the remainder of the product, again due to the price tag but at this point I’m  just going to chuck it because its more harmful than helpful at this point. This just goes to show you – not everything everyone is loving is right for everyone! Hopefully reading this saves you $28 (more more)!

Olaplex

Have you tried any of Olaplex’s products? What did you think?

Maureen

Kopari Coconut Skincare Review!

Aloha!

I don’t know if its me now being a mom or getting older (just had another birthday, sigh) but I recently have wanted to upgrade my skincare and use good, quality products. After using the last of a moisturizer (which will not remain nameless, but it will come in my next post about disappointment products I have used in the past year) I was SO excited to hit “Get in my bag!” on the Kopari site last week. This company, which cleverly uses social media in a big way to get in my face (on my Instagram and Facebook feeds) with short little videos with different women (employees and models). All their products are based on organic coconut oil, which I already use on my body, hands and face so I knew it was a no-brainer. The line is sold but at Sephora and Ulta but the set I chose is only available online. Before hitting the purchase button, I read the reviews, all of which were good. So I signed up for their emails, got myself 15% off and clicked to purchase.

Here are my thoughts:

Cleansing Oil: I have never used a cleansing oil so I really have nothing to compare this to but I liked it. My initial thought was that it was going to be a heavy, greasy experience but it wasn’t at all – also I only needed one spray in my hand and it took all my make up off (which was a surprise).

Rose Toner: This is not your typical “toner” where you apply with a cotton round or ball. I sprayed on after cleansing and felt refreshed. You can also use it as a makeup setting spray, but I haven’t tried that yet.

Face Cream: This, in my opinion is the pièce de rĂ©sistance of the whole set. I am pretty particular about moisturizers – I want to feel supple and dewy but not weighed down and greasy at the same time. This accomplishes how I want my face to feel and look and you don’t need to use that much product.

Lipglossy: I was pleasantly surprised by the lip gloss as I thought for some reason it would be tacky or heavy but its not. Its light but also super-hydrating and you only need a  small amount. I think you could also use this on cuticles or rough patches in a pinch.

Along with the set I received a free sample of the brand’s cult product, Coconut Melt. This, I wasn’t that impressed with only because it smells and behaves just like my coconut oil in a jar at home (which some of the reviews did mention). You can use this as a “multi-tasking” product as you can regular coconut oil – as a body oil, hair conditioner, baby balm, etc. I’m thankful for the free sample because I was interested in what it smelled and felt like, but now that I know I will not be purchasing that particular item in the future.

Final thoughts: I would definitely recommend this product set if you are looking for a new and easy facial regimen. If you could only choose one item to get, I would choose the moisturizer as I think its the standout product but I will most likely purchase these all again.

Want to try it for yourself? Make sure you sign up for their emails first and get your discount!

Kopari Coconut Skincare


Let me know what you think!

Maureen

Two new mascaras… and a new baby!

Well, friends the past few months have been busy – my husband and I welcomed our son Hunter in June to our family. We (as well as our cat Emma) are in love and enjoy every minute (even ones spent listening to crying)! Although I have had a lot going on, I still have made some time to purchase a few new beauty items and wanted to share my thoughts in case you were thinking of purchasing either of the below in the near future. But first, a picture of the kiddo 🙂

Hunter


Dior DiorShow Pump ‘N’Volume

When this came out in the spring, I couldn’t WAIT to try it. I read about it on blogs and was waiting for my Too Faced Better Than Sex tube to dry up so I could order this from Sephora and not feel guilty about forking over the $29 for it. The hype about this mascara is that it comes in a squeezable tube, so that you can use all the product inside and prevent dry out by squeezing the tube and warming it up as it gets older. I read that the formula was also great, very black and resulted in fake-like lashes. SOLD. When I actually tried it however, I was less than impressed. I found that although it was cool that I could squeeze the tube, it didn’t really do anything. I also did not like that the mascara (although very black and dense in color) did NOT come off for about three days. I don’t mean that in the good sense either. For three days I had raccoon eyes, even with face wash and remover used. I don’t like product of any kind that is that hard to remove so for me this was a no. I don’t know if I was disappointed because my hopes were so high or that it was just wasn’t worth the price tag. Either way, my advice is to pass on this product.


IMG_2956


Loreal Voluminous Lash Paradise

One mascara I would recommend is the new Loreal Voluminous Lash Paradise, which I just recently purchased and tried. Judging by the packaging (light metallic pink with thin black type), I think this is supposed to be a dupe of Too Faced’s Better Than Sex. Like the more expensive version, Loreal’s new mascara also promises volume, length, and intensity- all for the low price of $10. I am usually really happy with Loreal’s mascaras, so I had a feeling this would be a winner with me and I was right. It provides drama-like lashes from a drug-store brand. For the same price as one Too Faced mascara ($23 – still super reasonable for department-store mascara), I was able to get the Loreal Lash Paradise and the Voluminous Primer that I enjoy using under my mascaras to give some extra oomph. I still love Too Faced’s version but this is a great option for a cheaper price tag – and you can get it anywhere.

Thinking of trying either of these? Hopefully these reviews helped!


“Silicone Valley”

For the past few years, the Beauty Blender has changed how we apply makeup, creating an airbrushed look for liquid foundations, concealers and even cream blush. What once started as simple egg-looking soft foam sponge has blown up – now available in all colors and sizes and even has created a slew of copy-cats at a cheaper price. I am no stranger to the Beauty Blender and I love it for the great application and airbrushed look it creates. Here is what I don’t like about it – its a pain to clean. Like a big pain. And you have to clean it regularly in order to keep it in great shape. Internet photos and videos have showed what happens if you don’t clean – disgusting results of cutting the egg sponge open and seeing grossness in it. The other thing that made me hesitant in trying it is the cost. For what it is, its not cheap. One Beauty Blender costs a whopping $20! All that being said, I would say if you are looking to try it, I would. I can guarantee you will love it.

But this post is not about the Beauty Blender. Its actually about a new makeup applicator looking to rival the egg and you’re never going to believe what it is – a silicone sponge that yes, resembles a breast implant. I was shocked at this too when I saw a ton of articles and posts about it on the Internet but give me a minute to explain. The applicator, although takes a while to get used to, really has some great benefits that the Beauty Blender lacks. First, the price is a lot cheaper. Because you can’t get one yet at any of the major beauty retailers like Sephora or Ulta, I took my search to Amazon, which of course had many options to choose from. The one I choose was only $7 and came with Prime shipping so I was able to try it right away. Secondly, you are able to clean (we’ll call it the implant) immediately after use with soap and water and then either dry it or have it sit out. That’s probably my favorite part about this little thing as I really dread cleaning the Beauty Blender (and don’t do it as often as I should). Lastly, after you figure out how to use it, uses a LOT less of your makeup product than the Beauty Blender, which means you save more product and ultimately, more money. How you want to apply it is lightly apply your foundation first with your fingers and then use the implant to pat it on and get into all creases/areas. Its definitely not as easy to use for a first timer as the Beauty Blender or even a brush or sponge, but I think the results are great and the other factors far outweigh it.

Silicone Sponge


Have you tried this yet? What did you think?

“Bring it on Home”

Throughout my life I have had many, many manicures. Unlike most women,  I don’t doze off or get lost in my thoughts during this relaxing time. My eyes on glued to the manicurist’s hands, holding mine and using tools, polish and cream to make them beautiful. Although not a certified nail technician, because I spent so much time studying their techniques I have taught myself to recreate the perfect (or at least a really well done) manicure at home. I know all the steps from the prep to finish, with some extras like paraffin wax and oil thrown in occasionally. This is far from my first rodeo. Although I can recreate to the best of my abilities their manicure at home, sometimes it just can’t happen due to lack of resources (ie, I don’t have a gel UV lamp, I don’t know how to do acrylics or have a paraffin wax heater at my disposal). For the first time however, the gel look is becoming more of a reality than a salon-only habit.

Creative Nail Design (who make one of my all-time favorite lotions) is a leader in the gel arena and if you go to your local nail salon (specifically the New England chain Miniluxe) you will find it as one of your only choices for gel. The company also has the same colors offered in a gel-like polish that promises to last one week, without the use of a uv lamp. The line is called Vinylux and won’t cost you any more than your standard manicure at a salon. But here is the best part – now you can buy the polishes on your own! This means two coats of the Vinylux plus their special topcoat and you’re good for a solid week, with the same color as you can find in the gel line. You can’t purchase the line on their site, but you CAN purchase it at Ulta as well as other salons. As of this year, you can also purchase this line on Flash Sale sites like Rue La La for a discount ($7.99 versus Ulta’s $9.99). You will not be able to find all the shades that are available but if you find a color you like, its well worth it to scoop it up at a discount. I just scored Plum Paisley and love it!

If you’re just fine with doing your nails yourself, I strongly suggest checking out this line. For the same price as my beloved Essie and rival OPI, you will get more wear out of the polish and save your dollars for something else – say the pedicure you CAN’T do yourself 🙂

cnd

Happy Polishing!


“Two are better than one”

I love mascara. And I mean, I LOVEEE mascara. I take after my mother in this sense (as well as many others), and we are both have a thing for big, bold, doll-like lashes. I personally don’t feel complete until after I’ve applied it and if I only had to put one thing on before I left the house, it would be this. As you may have read in some of my other posts, I am always on the search for the newest, latest and greatest if it means I’m going to achieve fake-lash status (without wearing actual fake lashes). Two products I’m going to talk about in this post actually work really well together- even better!

I actually found the first one by asking two of my team members at work the same question – “What mascara are you wearing?”. I kid you not, I only asked the two of them, in the same email. To my surprise, they BOTH answered with the same mascara – Lancome’s Hypnose Drama. It has a nice dense black color with a curved wand to give a subtle curl. One of them suggested I also try out the primer from Lancome to really up the pow-factor (which I did, obviously). When I was out of the primer and mascara, I decided to re-purchase the mascara for sure, but wanted to try out the Loreal version of the primer. Good decision. The Loreal Paris Voluminous Primer I found to work just as well, if not better than the Lancome version for half the price! I don’t use this everyday but if I really want a dramatic effect, I put this on top and bottom first (it comes out white which actually helps as a guide for the black mascara to be applied to) and then apply two coats of the Hypnose Drama. I highly recommend both products if you like your mascara like me – big and bold – and don’t mind adding a second step.

mascaras

“Rip it off like a band-aid”

This title is a lyric from one of my favorite songs from Old Dominion and applies to this review as well. Ok, maybe “rip” is a little aggressive for this lip gloss as it isn’t actually supposed to be “torn” off but it is very interesting to say the least. I found this product on Facebook, watched the video as it is very intriguing. The concept is a lip gloss that sets on the lips for up to ten minutes and then turns into a rubbery feel on the skin. At this point, you gently tug on the end and peel it off slowly, leaving behind a subtler (but still vivid) stain of the ultra-bright gloss you originally applied. The end result lasts for hours, which is amazing. You can either wear alone or top with a white gloss to make it shiny or a balm to make it dewy. Sounds good, right? Here is what I thought:

I applied  Berrisom’s Oops My Lip tint in pink generously to both upper and lower lips, making sure not to miss any spots.  After about five minutes you can feel the gloss start to turn to a rubbery consistency and you know it’s ready to be removed. I peeled off the gloss, which reminded me a lot of glue being removed from your hand when you were a kid (which was fun to be honest). The color left behind was more intense than I would normally wear but I still liked it. Best of all, it last hours. I topped it  with my Maybelline Baby Lips lip balm in clear because I like a little dewy shine on my lips and this combo was perfect.

The downside was that when I ordered it from Amazon it took over a month to get to me. I know it’s coming from Korea but come on – over a month for a ten dollar item? I would be interested in trying more colors because of the longevity you get from the color after applying but I like my beauty products readily available to me and prefer not to wait more than a few days to get them. If you don’t mind waiting the time (and perhaps that increases your anticipation) then I would recommend this.


Korean Lip Gloss


What do you think of this lip gloss trend?


Maureen

It’s Peanut Butter Jelly Time!

Nothing brings back memories of one’s childhood lunch like a good old PB&J (or if you’re from New England, Peanut Butter & Fluff!) But this particular reference to Peanut Butter & Jelly is not the edible kind. I’m referring to Too Faced’s new eye shadow palette called the Peanut Butter and Jelly Eye Shadow Collection ($36, exclusive to Ulta). The palette was inspired by Peanut Butter, which is also one of the shades in the Too Faced Semi-Sweet Chocolate Bar, and features nine gorgeous shades of eye shadow inspired by peanut butter and jelly. The Too Faced Peanut Butter & Jelly Eye Shadow Palette is your standard palette from this brand. It comes housed in a tin with a Glamour Guide located inside with tips on how to create three signature looks. I like the packaging a lot, it is compact and has a mirror which makes it travel friendly. It most definitely smells like peanut butter but for me it smells more like peanut butter and chocolate (but I’m not complaining).

Too Faced sometimes re-runs their shades however, I don’t really feel that way with this one. The majority of the shades have a fresh appeal and the palette consists of shimmer, frost and matte finishes with soft, blend-able textures. There was minimal fall-out, even while I was packing the color on my lids. The shades are grouped by trios but you can use them in any combination you wish to create dynamic eye looks.

  • Bananas (soft peachy gold w/ fine gold shimmer)
  • Extra Creamy (matte creamy beige)
  • Jammin’ (dark chocolate w/ golden sparkle)
  • Jelly (vibrant orchid)
  • Nuts About U (matte brown w/ red undertones)
  • Spread the Love (medium peach w/ gold sparkle)
  • Peanut Brittle (metallic burnt orange)
  • Peanut Butter (matte medium orange brown)
  • Peanut Butter Cup (metallic golden bronze w/ gold sparkle

PBandJ

The tones of these shades are warm and the matte browns (as well as the copper and purple shades) contain a noticeable amount of red, which can make for tricky colors to wear sometimes, depending on your skin tone. I created a look using Extra Creamy all over the lid up to my brow bone and then blended Peanut Butter all through the crease. I took Nuts About U and used that to define the outer corner of my eye and then used Bananas in the inner corner. Lastly, I took Peanut Brittle and used that to create a nice gradient from the inner corner to the outer. For the bottom lash line I used a purple liner and then smoked it out using the Jelly shade. The shimmery shades definitely have the best pigmentation and Nuts About U could be the most difficult to wear without chalkiness; but if you blend them well, you should see no issues. My only con about the palette is the fact that it focuses more on peanut butter versus jelly as there are only two shades of purple in this palette. So if you like warmer shades you’ll likely adore this cute little palette but for those expecting more jelly or purple shades, well, it could be slightly disappointing. That being said, this palette is a must- have for my collection. I even bought one for my god-daughter after hearing they were sold out where she lives. If you love makeup as much as I do this palette makes the beauty game that much more fun.

Besides, it isn’t hoarding if it’s makeup!

Your guest blogger,

Lori